Changing the IP address of a domain controller (DC) is a procedure that requires careful preparation, as it can affect the availability of domain services for clients. However, with proper planning, changing the IP address of a domain controller can be performed without complications or disruptions to the Active Directory (AD) infrastructure.
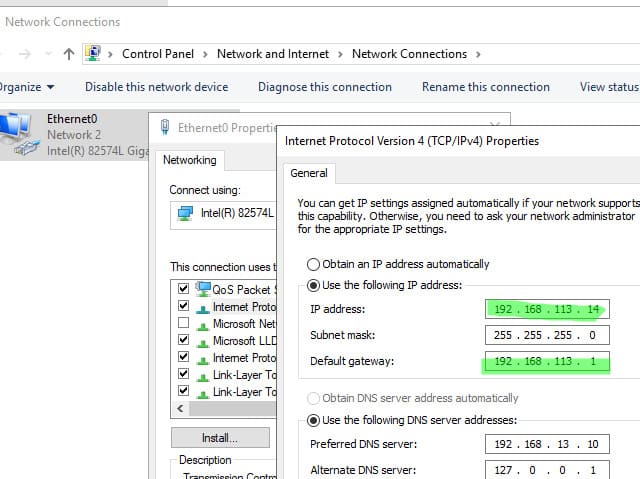
In this case, we need to change the static IP address of the domain controller spb-dc02 from 192.168.13.14 to 192.168.113.14.
Step 1: Preparing to Change the IP Address
Before proceeding with the IP address change on the domain controller, complete the following preparatory steps:
1. Ensure that your network has multiple domain controllers deployed.
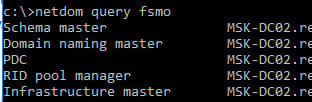
2. Verify whether spb-dc02 holds any Flexible Single Master Operations (FSMO) roles:
netdom query fsmo
If the controller holds FSMO roles, transfer them to another DC.
3. If spb-dc02 is configured as a DHCP server, reconfigure it to distribute the new IP address as the secondary DNS server for clients.
4. Check the replication and health status of the domain controller before changing the IP address:
dcdiag.exe /s:spb-dc02 /q

repadmin /replsum

repadmin /showrepl
Ensure all tests complete without errors.
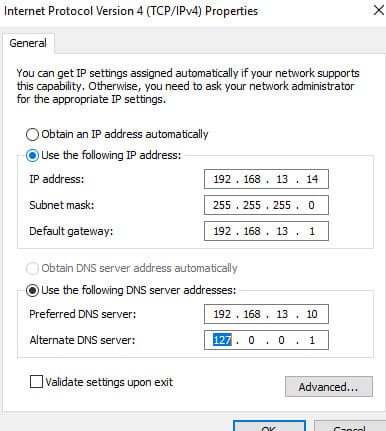
5. Verify DNS settings: the Preferred DNS server should point to another domain controller, and the Alternate DNS should be set to 127.0.0.1 (loopback).
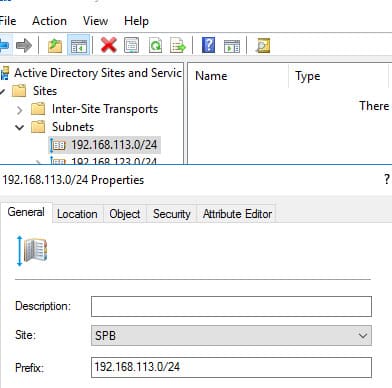
6. If you are changing both the IP address and subnet, ensure the new IP subnet is added to the AD Sites configuration and assigned to the appropriate site.
7. Identify devices using the old IP address of the DC as their DNS server. These may include printers, scanners, or manually configured network equipment. Ensure these devices are configured with at least two DNS servers.
8. If the network is segmented by firewalls, add rules for the new IP address to allow access between segments.
Step 2: Changing the IP Address of the Domain Controller
1. Schedule a maintenance window to minimize user downtime.
2. Connect to the DC via the console (if it’s a virtual machine) or through the server management interface (iLO, iDRAC, KVM-over-IP).
3. Open the Network Connections panel (ncpa.cpl), access the network adapter properties, and change the IP address (and subnet, if necessary). Save the changes.
4. Clear the DNS cache and update DNS records:
ipconfig /flushdns

ipconfig /registerdns
This will update the domain controller’s DNS records (including SRV records in _msdcs, _sites, _tcp, _udp).
5. Restart the DNS and Netlogon services to refresh DNS registrations:
nltest /server:spb-dc02 /dsregdns

net stop dns & net start dns

net stop netlogon & net start netlogon
6. Update SPN records using the command:
dcdiag /fix
Step 3: Verification After Changing the IP Address
1. Verify the domain controller’s health and replication status:
dcdiag.exe /s:spb-dc02 /q
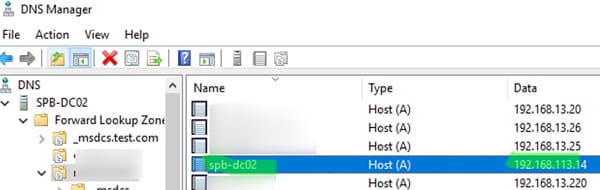
2. Check the DNS record updates in DNS Manager. Ensure that the new domain controller records are correctly created in both forward and reverse DNS zones. If old IP records remain, delete them manually.
3. Remove the old IP address from DHCP zone settings (if DHCP is used). Also, update static DNS settings on devices where the old IP address was specified.
Properly changing the IP address of a domain controller requires thorough pre-checks and follow-up actions to minimize the risk of disruptions. By following these steps, you can seamlessly change the IP address of your domain controller, avoiding issues with domain service availability and network infrastructure.